Want to refine your visual style? Our Foundry Katana tutorial will show you how.
Diving into a new tool can feel overwhelming—we get it. That’s why we’ve put together this Foundry Katana tutorial. When you’re just starting out, it’s tough to tell which features matter most or how to streamline your workflow. Or maybe you’ve used Katana in a studio setting before, but now you’re stuck building your own projects from scratch (trust me, I’ve been there). When you’re eager to jump in, it’s easy to skip over the basics. If you want to see Katana in action on a big project, check out Creative Bloq’s breakdown of The Lion King.
In this guide, we’ll walk through the core concepts that’ll kickstart your journey with Katana—the Foundry’s go-to tool for look development and lighting.

For more 3D tips, don’t miss our guides to 3D modeling software and Blender tutorials.
How to Use Foundry Katana
01. Build Your Projects Efficiently
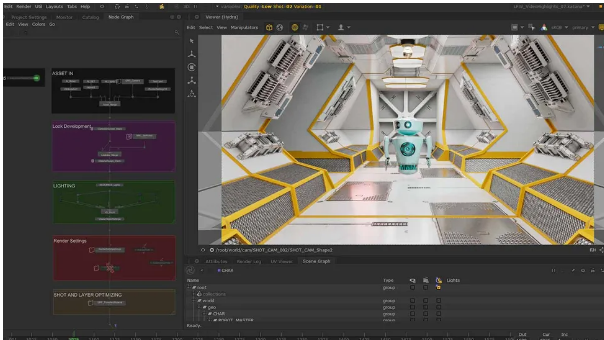
First thing to know: This Foundry Katana tutorial focuses on Katana’s role at the end of the 3D pipeline. That means Katana isn’t just a look development and lighting tool—it’s also a scene management tool where you assemble elements from earlier stages (like modeling, layout, animation, VFX, and grooming). Flexibility here is key because your projects will be susceptible to frequent changes: asset updates, optimizations, and more. Katana shines for adapting to these shifts—just build your projects with the expectation that some elements will change.
Start by asking: What sections do I want to keep consistent? What parts need to stay flexible as I iterate? Once you answer that, structure your Katana projects so you can quickly make the tweaks you need throughout production.
02. Represent All Operations in a Node
This lays the groundwork for an incredibly flexible, non-destructive workflow—whether you’re working solo or in a team. Being able to trace your steps and see exactly what’s happening at every stage is a huge win. It’ll save you time and confusion, especially when you’re deep into a project.
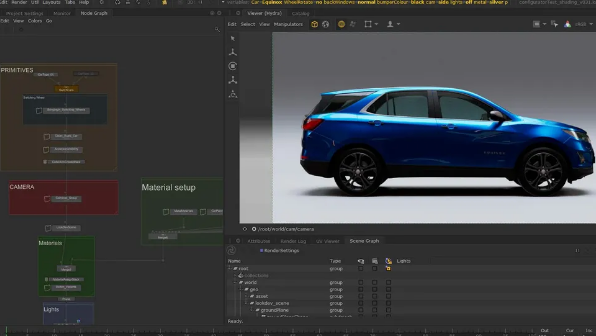
03. Divide Your Node Graph Into Tasks
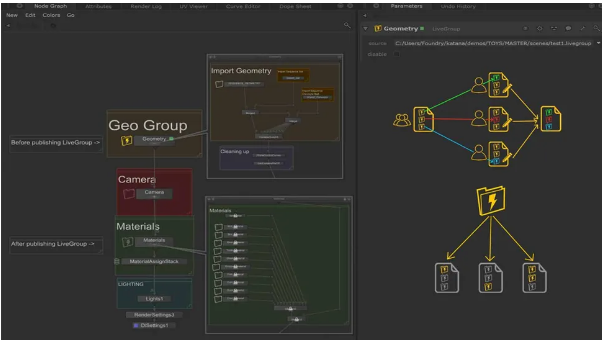
Keeping your Node Graphs organized and clean is non-negotiable. It’ll make navigating your projects easier for you—and for teammates if you’re collaborating. Use backdrops and clear node names to stay oriented; it’ll cut down on time spent hunting for specific elements.
Another pro tip: Version different parts of your Node Graph separately from the rest of your project. This lets team members work in parallel without stepping on each other’s toes. And if you need to share work across multiple projects, identify the common components. LiveGroups are perfect here—they let you reference work across projects, so when you update the LiveGroup file, all projects using it pick up those changes automatically.
04. Recycle Your Work—What’s Reusable?
Automation is your friend. Building your own tools will help you avoid repetitive tasks and save time. If there are operations you do often (even daily), it’s worth figuring out how to automate that workflow.
Even if you’re not super tech-savvy, don’t stress. Macros are a great starting point for creating your first Katana tools—here’s a set of videos to help you get started with them. You can also use tools like OpScripts, the Python tab (for automating the Node Graph), and Supertools to boost automation. Setting up a template will also speed up your workflow—no more starting scene setups from scratch every time.
05. Optimize Your Work
Optimization is usually the last thing anyone wants to think about—but it matters. For faster feedback during interactive sessions, use InteractiveRenderFilters. This node is easy to repurpose because it isn’t linked to the rest of the Node Graph. You can use it to overwrite or build on top of your existing projects without disrupting your main workflow.
06. Find Learning Resources
When you’re learning a new tool, knowing where to start is half the battle. The Foundry’s website is a goldmine for resources: articles, community forums, case studies, and learning content. Their tutorials page has videos, and some even include downloadable assets—so you can follow along or check out a final project example. You can access those right here.