Why Trust Me for This Review?
If this is your first visit to our site, let me introduce myself: I’m Thomas Boldt, and I’ve been immersed in the world of digital arts for over 20 years. In my work as a photographer and in my own personal practice, I’ve tested nearly every photo editing app available today, and I can help you separate the good ones from the bad ones.
When combined with my passion for photography, my lifelong love of computer hardware and software has given me a unique perspective on modern photo editing processes. I started editing images long before automatic “AI-powered” tools were common, and I’ve been following the recent AI product launches closely as every developer rushes to add these new features to their software.
Last but not least, it’s important to point out that inPixio did not provide me with a free copy of Photo Studio for this review, and they have no input or editorial control over the comments and conclusions that I make. You’ll be able to tell 😉
Detailed Review of inPixio Photo Studio
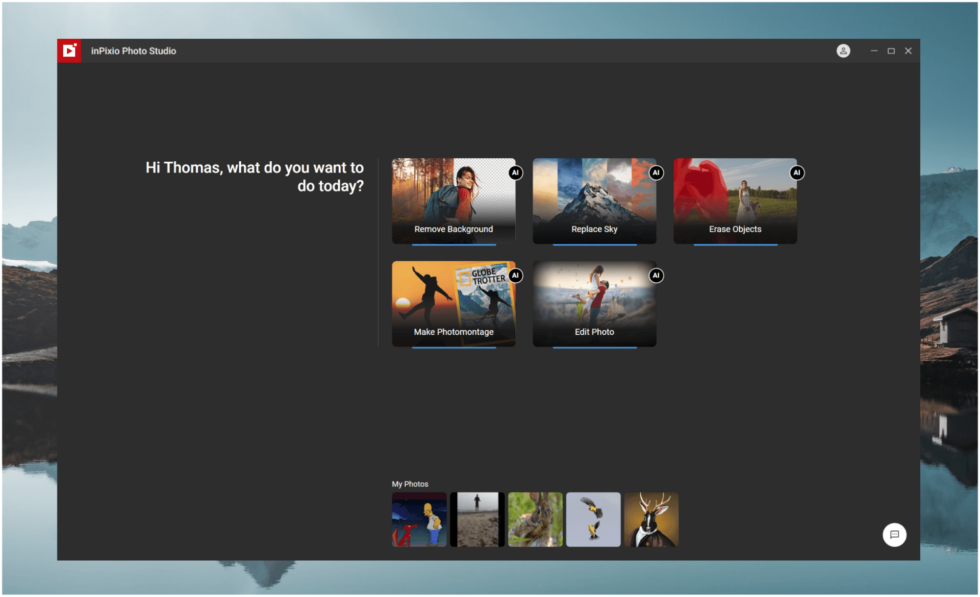
When you load inPixio, the interface is neatly streamlined into five sections, one for each type of image editing task that you can complete with Photo Studio.
Remove Background, Replace Sky, and Remove Objects are inPixio’s new “one-click editing tools” that use machine learning techniques to make automatic selections for you. Make Photomontage lets you place your images in simple designs like cards and joke magazine covers, while the Edit Photo section is used for more basic image adjustments.
Let’s take a look at each section to see how they work and whether they live up to inPixio’s promises.
Remove Background
The Remove Background tool is designed to do exactly what it says: it detects the main subject of your image, makes a selection around it, and then deletes the rest of your image. This should leave your subject on a transparent background, ready to be placed on a different colored background or into a whole new image.
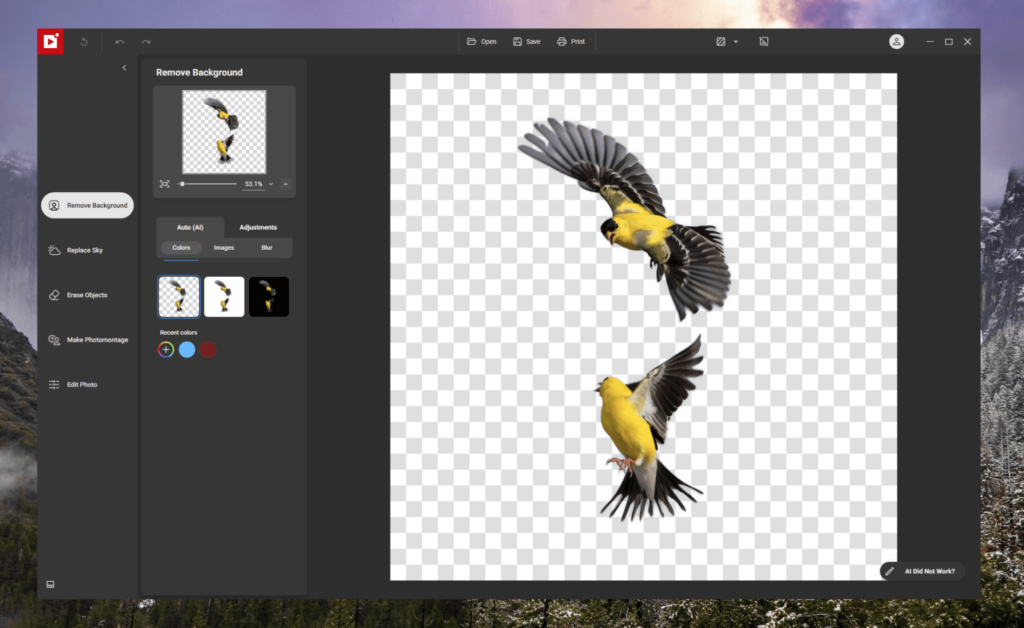
For the most part, this tool works fairly well, although it can get confused by complex images that don’t have a clearly defined main subject. Even when the subjects are well-separated from the background, like in the image above, the AI needs a bit of help at the edges near some of the more complex elements, like the spaces between the tips of feathers.
Fortunately, inPixio allows you to adjust the areas of the automatic selections that it makes, as you can see in the screenshot below. You can specify three different areas of your image: the red background areas to be removed, the green foreground areas to be kept, and the yellow edge areas, where the AI does the more difficult job of deciding which pixels are part of the background and which are part of your subject.
This refinement system works well, although it does make me wonder why the ‘edge’ section is always the same width, especially when inPixio allows you to adjust your brush size. The default large brush size used by the automatic process works fine for large objects with simple edges, but anything with fine details – such as the spread of feather tips above – gets a bit lost.
My personal take: The AI does a decent job of making selections automatically, and the option to refine the selections by hand really helps to improve the final result. I wouldn’t want to use this tool for any kind of serious work, but for most home users who just want to play around with their images, it does a pretty good job.
Replace Sky
Next up is the Replace Sky option, which allows you to automatically select the sky in your image and swap in a new one. You can select from a fairly limited number of preset skies (just 36 in total), or you can use one of your own images as a sky replacement.
This tool isn’t quite as successful as the Remove Background and Remove Objects tools since my testing found that it doesn’t do a great job of selecting the sky automatically unless the horizon line is very clear and straight. As you can see in the skyline sunset image above, the low clouds next to the setting sun were detected as part of the foreground and didn’t get removed along with the rest of the sky.
However, just like in the Remove Background tool, you can adjust the automatic selection by hand using a brush-based tool to specify which areas count as the foreground, which counts as the sky, and where the edge is between the two.
inPixio also includes some tools for adjusting the color of the inserted sky, as well as for tweaking the colors of the foreground to help them blend a bit more naturally, but it would be nice to be able to reposition the sky image to make it match the horizon line in your original photo.
When I tried using my own personal sky images as replacements, inPixio would often include foreground non-sky elements from the image, and since you can’t reposition the replacement sky image, the whole illusion falls apart.
My personal take: This is a fun tool for adding some drama to a holiday snapshot with a boring sky, but you’re probably not going to be able to fool anyone into believing the replacement sky is the real deal. To be fair, most sky replacement tools in other apps also struggle with this problem, but it’s not a perfect one-click edit.
Erase Objects
Now we come to the third of inPixio’s one-click editing tools, Erase Objects. This tool will attempt to automatically detect the different objects within your image so that you can simply click on the object you want to remove, and inPixio will erase it and fill in the background.
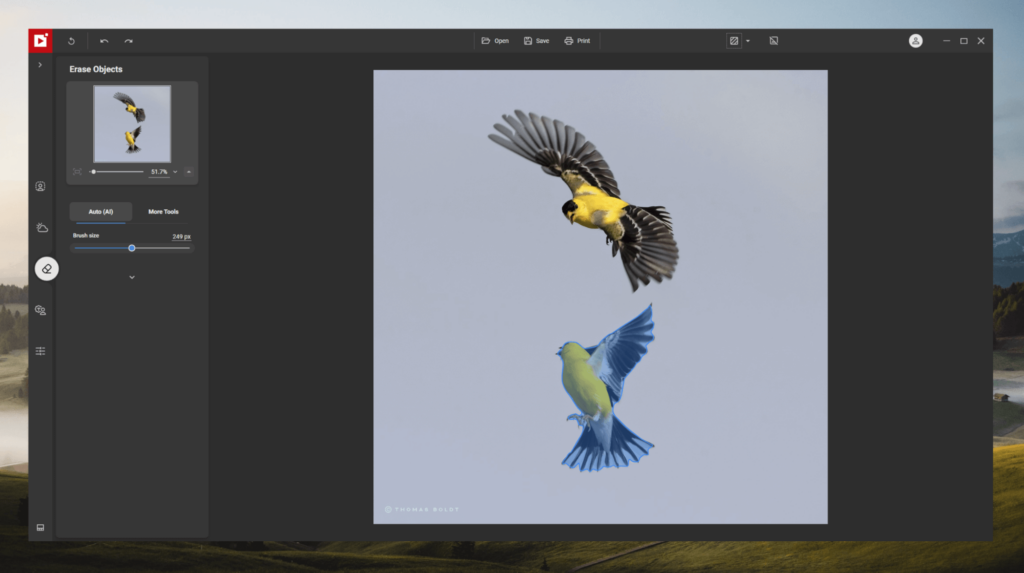
Each separate object that is detected will display a colored overlay when you hover your mouse over top of it, and a single click is all that you need to remove the object. It may take a couple of seconds after you load the image to detect all the different objects, and it would be nice to see a progress bar or some other indicator that tells you that the app is actually working on something.
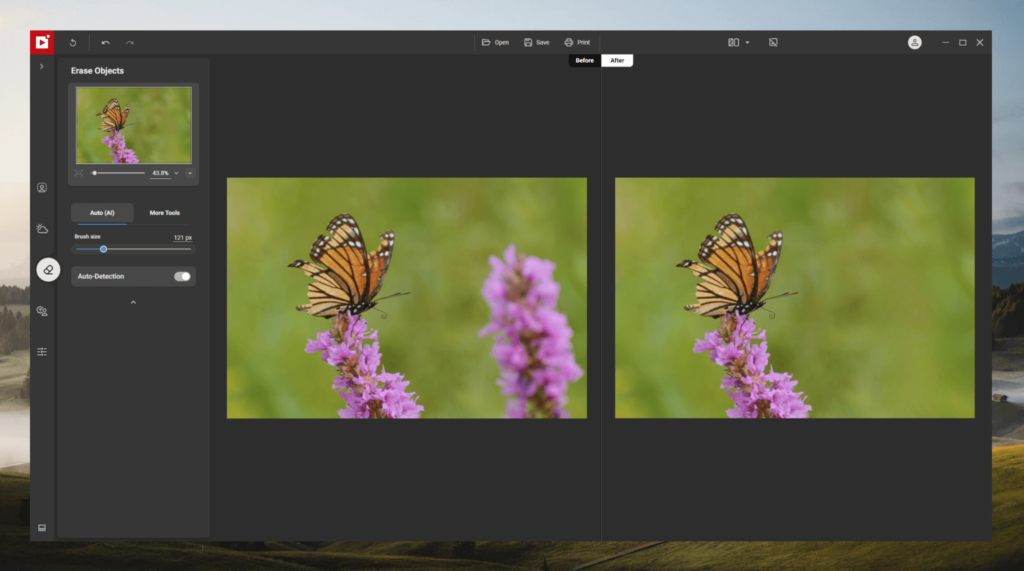
Unfortunately, the tool isn’t completely flawless, and sometimes its automatic object detection can fail completely, as I discovered when experimenting with the battered monarch butterfly image below.
This is a bit frustrating since there’s no indication of whether or not the AI is still trying to detect any objects. If it fails, you’ll simply be left with a basic brush tool that you can use to direct the AI, as you can see above. Fortunately, inPixio still does a decent job of removing the object, as you can see below.
If you don’t want to bother with automatic object removal, the Erase Objects section also includes decent clone and patch tools for manual object removal. The tools are fast and responsive, so you’ll be able to make your edit look totally seamless.
My personal take: I think this is the most successful of inPixio’s three AI-powered tools since it usually does a good job of removing objects within your image. The replacement pixels could use a bit more polish when compared to the results you can get doing the removal by hand, but for most users, this tool will do a great job.
Make Photomontage
The Make Photomontage section is a modified version of the Remove Background tool that allows you to insert your image into a pre-made design, such as a greeting card or joke magazine cover. If you don’t want to use a preset, you can add custom graphics, shapes, and text to make your own design.
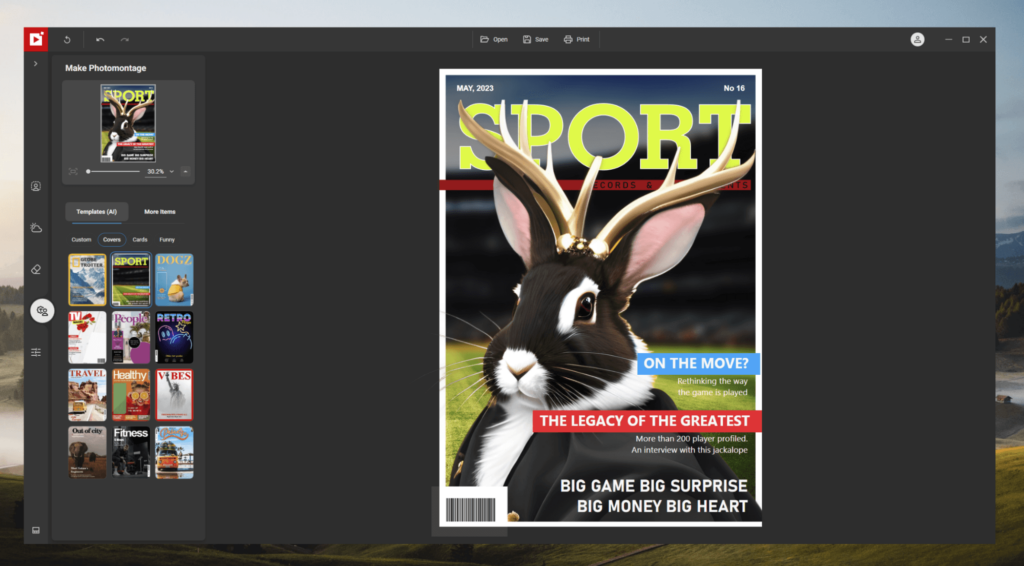
While Make Photomontage automatically removes the background from your subject, it doesn’t allow you to make any adjustments, so it’s usually best to start with the Remove Background tool and then switch to the Make Photomontage section once you’re happy with the background removal results.
Unfortunately, there are only 12 different magazine covers, 12 different cards, and 12 different funny meme templates to choose from, so you’re a bit limited in your options. You can create your own designs, but the tools are pretty basic and get frustrating to use once you add several different image elements.
My personal take: This is a fun feature at first, but it’s limited because of the very small number of preset options. There’s no way to make new preset graphics and no system or store for adding more, so I think this feature will run out of novelty pretty quickly.
Edit Photo
Last but not least, the Edit Photo section allows you to make more general adjustments to your image, from cropping to color adjustments to photo filters. You can also allow inPixio to try a one-click automatic edit of your photo, although I found the results to be extremely oversaturated.
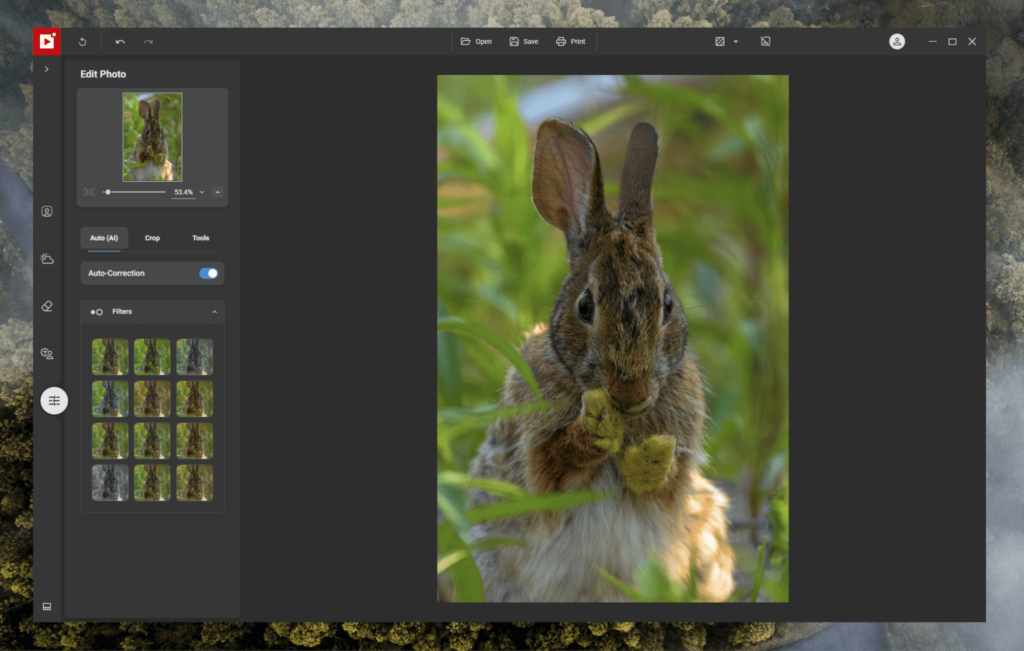
That being said, many people seem to love oversaturated images, so maybe this will work well for you – and if not, you can simply decrease the saturation slider to correct it. Even if the automatic edit could use some work, the rest of the editing tools in this section are excellent.
This section also allows you to apply custom color filters, add frames, and also apply texture overlays to simulate a range of film camera effects, such as a scratched negative or light leak.
Once again, though, it has the same problem as the other sections: a limited number of presets and no way to add new ones, so you may get tired of using the same effects over and over again.
My personal take: Along with Erase Objects, this is the most effective section of the program. The editing process is nice and responsive, and you’ll find all the editing options that you could possibly want.
The Reasons Behind the Ratings
Features: 4/5
For the most part, inPixio Photo Studio does a decent job of automatically editing your photos, but complex images can confuse the AI – and even some simple photos confuse it, too. It’s really nice when the AI manages to get the edit right the first time, but if you care about producing images that look good, you’ll have to spend a lot of time refining the automatic selections by hand.
Replace Sky seems to have the most trouble working automatically, and it has a limited set of preset skies that you can use as replacements. When using your own images, they can’t be repositioned to align the sky correctly, which makes the whole custom sky feature much less useful.
Pricing: 3.5/5
inPixio’s biggest problem is its pricing, largely thanks to its recurring annual subscription model that charges you every year to keep using the software – yet there are no guarantees about new features or preset content. Other beginner software has a lower one-time purchase price and can provide much better value – and better editing tools.
The inPixio sales website also uses some questionable marketing tactics. For example, it is permanently “on sale,” which means it’s not really on sale at all, yet if it seems like you’re about to close the sales page, they offer you an additional 33% discount.

Combine that with the fact that they try to bundle in additional software at an additional cost unless you read the fine print carefully, and you’ll understand why I give them a low rating on pricing.
Ease of Use: 5/5
Ease of use is where inPixio really shines, and this strength can make up for a lot of its other weak points, especially if you’re not very comfortable working with computer software. The interface is very easy to use, and it lets users of all skill levels experiment with photo editing.
While the results aren’t quite as good as you’d get from a more complex editing app, the fact that you can edit your images with just a few clicks will appeal to many casual home users.
Support: 4/5
inPixio has a good technical support system that includes in-app live chat, covering everything from the installation process to issues with using the app. They even offer to use Windows’ remote desktop feature to help you with the installation process, although I would never allow a stranger that kind of access to my personal computer.
I would give a higher rating, except there isn’t very much tutorial info available in the inPixio knowledgebase about how to actually use the tools. I’m used to learning new apps without any tutorial guidance, but most users appreciate a little more help when learning a new app.
The Final Verdict
inPixio Photo Studio makes complex image editing tasks accessible to everyone, even people who don’t know anything about photo editing. If you just want to make some fun edits to your family photos and holiday snapshots, then Photo Studio might be a great choice for you – but keep in mind that the included presets are a bit limited, so the fun might wear off a bit too soon.
If you have a question that isn’t answered in this review, let me know in the comments below, and I’ll see what I can do to help.
